BI Joe Documentation
A comprehensive self-help guide on using your rebranded outcomes and returns aid, “BI Joe”.
Introduction
What is BI Joe? What he can do for you?
BI Joe is an automated data action tool that processes student outcomes and returns (Scrub) files, providing you with a rapid turnaround and insight into what has changed. Upload your outcomes and returns to B.I. Joe and expect the changes in the cubes the very next day.
What has changed?
BI Joe has become more interactive and now comes in a Web UI format. Bid adieu to messy Jira tickets and a rigid BI Joe. Your BI Joe just got friendlier. You can:
- Upload the data files in the application
- Modify or even create your own configuration for processing
- Undo BI-Joe mistakes
- Expect the BI Joe results (duplicates, not found processing) in your inbox
How to use BI Joe?
This section provides a basic overview of the steps required to process the outcome files. These steps will be explained in detail in the following sections (You can exand the details by click on the section name).
Authentication or How to login?
This section provides guidance on how to login. You need to login for using BI Joe services. Refer following steps to login.
-
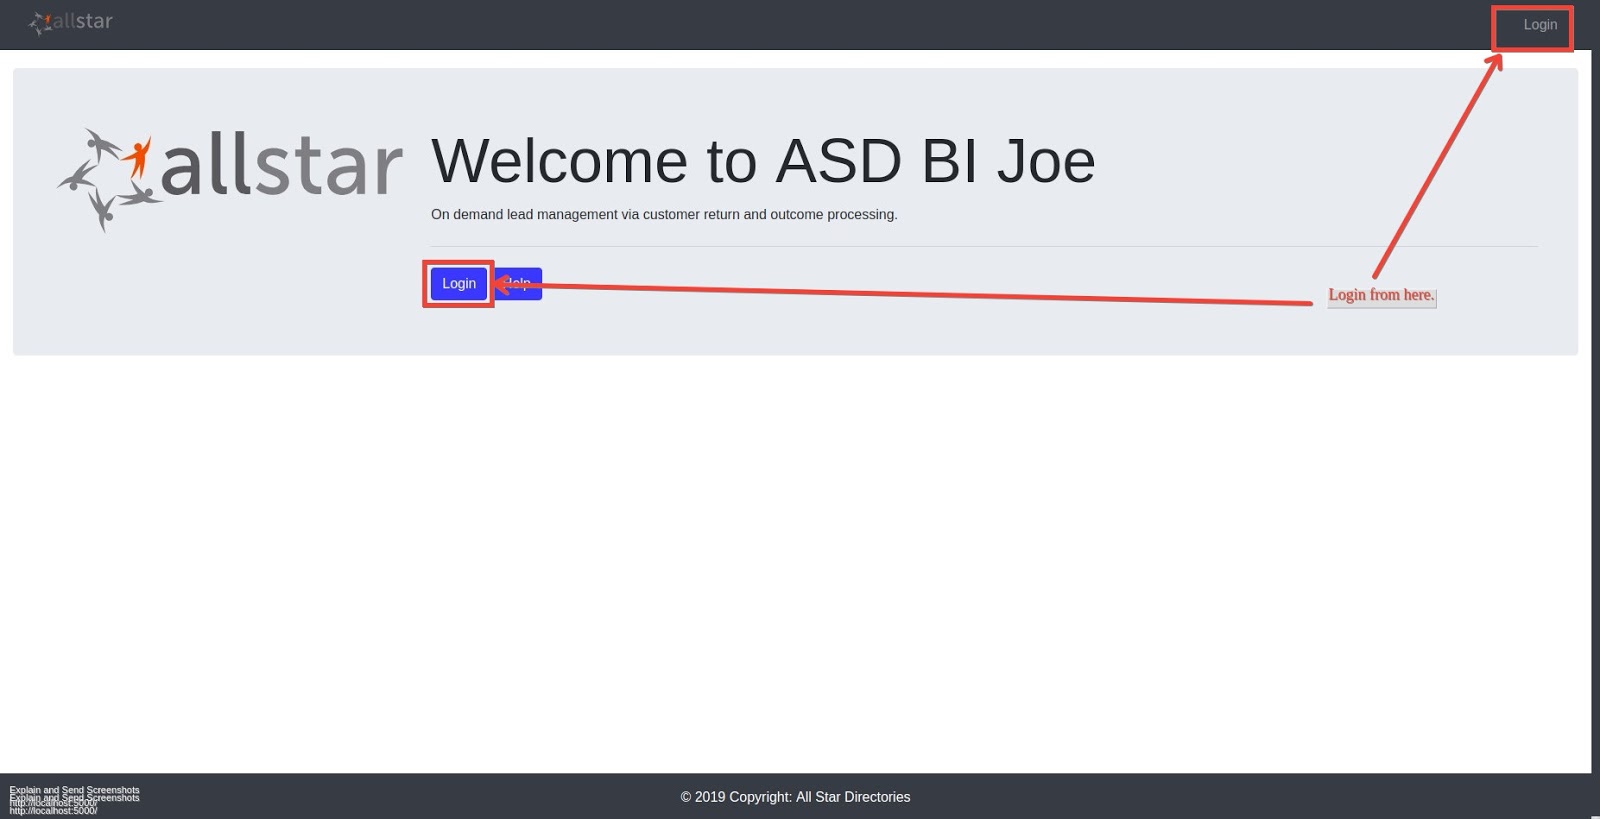
Navigate to the BIJOE website
-
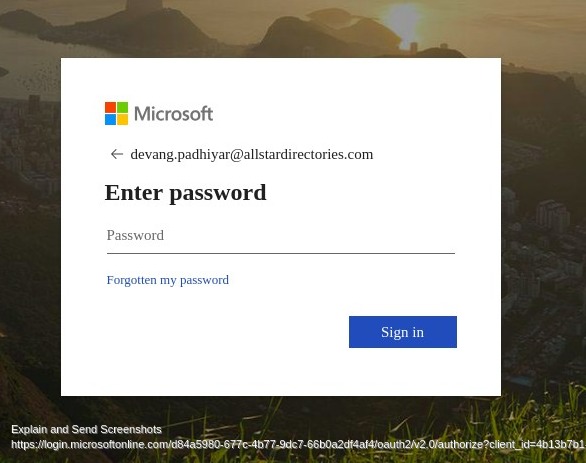
After clicking on the login button, you are redirected to Microsoft active directory login where youIf multiple records are found for leads as per the person identifiers mentioned, then these records find themselves in the “duplicate” file. All such records are sent in the email of the process file success report. can find username/email and password fields. Use your ASD email/username and password to continue.

-
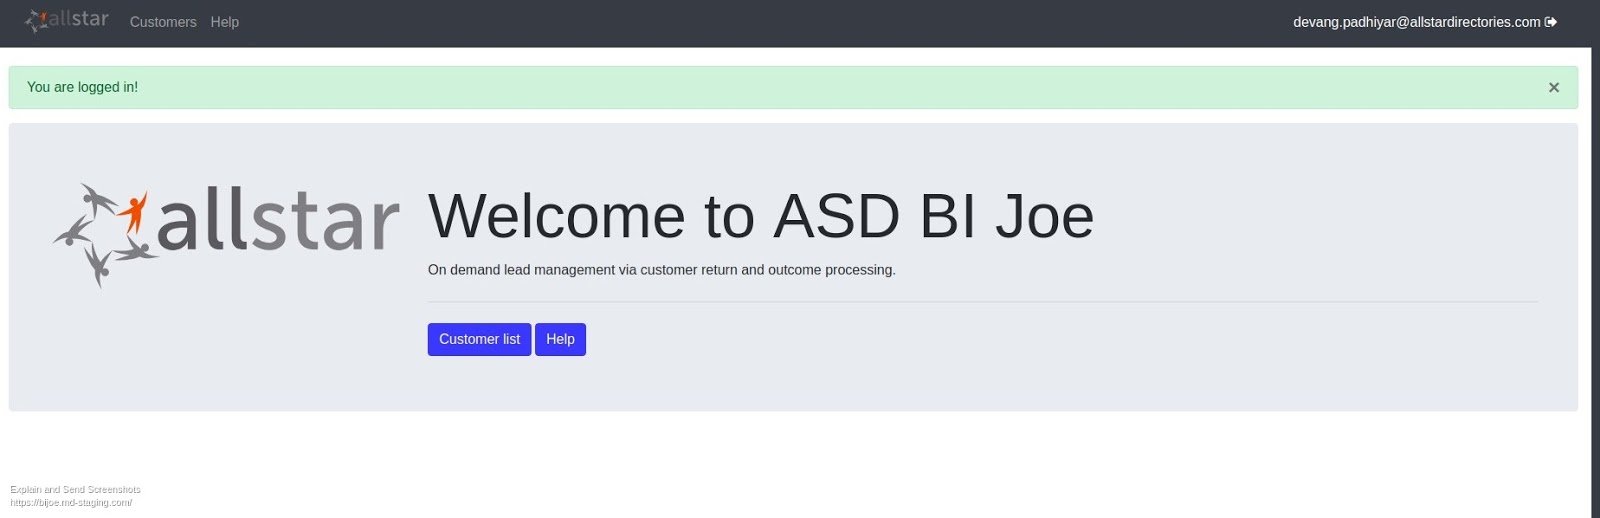
Voila! You are logged in. Send an email to data@allstardirectories.com if you are unable to login and we will be happy to help.
Customer / Customer-School selection
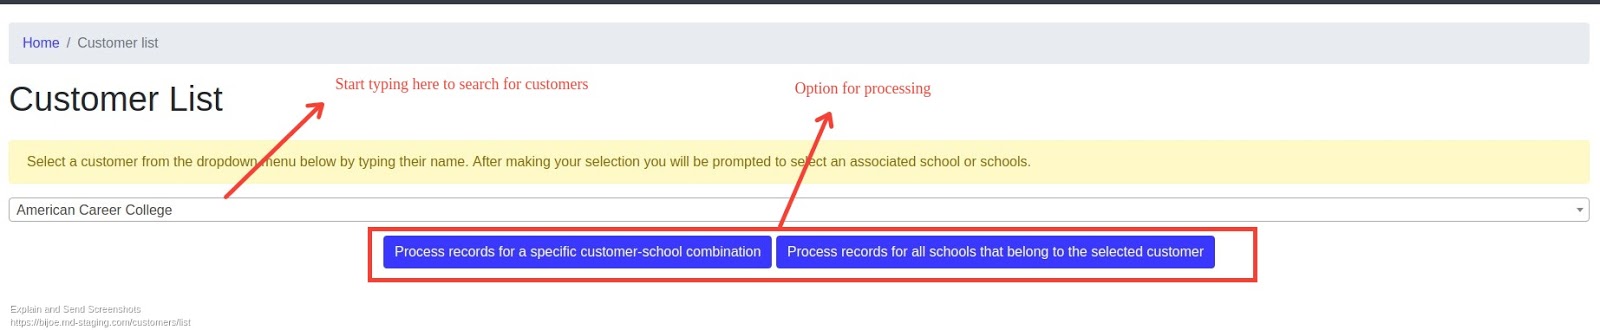
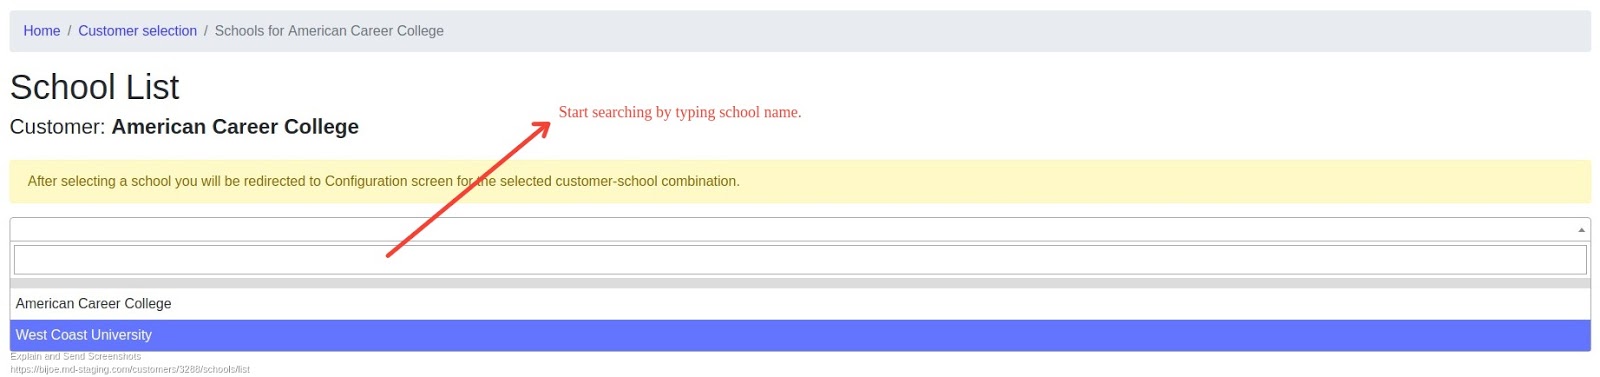
After login, please navigate to the customer link in the header or click the customer list button in blue color. Start typing the customer name in the text box. Choose a customer from the dropdown list. (Please refer below image for the reference.)
After selecting a customer, two options are prompted for processing.
-
Process records for a specific customer-school combination
If you select this option, then you are forwarded to the school selection page where you can search for schools using the text box. You will be presented with suggestions of the schools belonging to the selected customer. On clicking on the school, you will be directed to the file processing screen.
-
Process records for all schools that belong to the selected customer
If you select this option, you will bypass the school selection screen and will be directly taken to the file processing screen. Make sure to choose this option only if you want to process records for all schools belonging to the customer.
In the next section, there are information on how to process the files.
How to upload and process files?
Post selection, you will be introduced to the following screen.

It has two components (Please click on each component for more information):
-
File
Upload Area
You can upload a data file, duplicate file or not found the file in this section. You can also specify email addresses where the reports and email are sent.
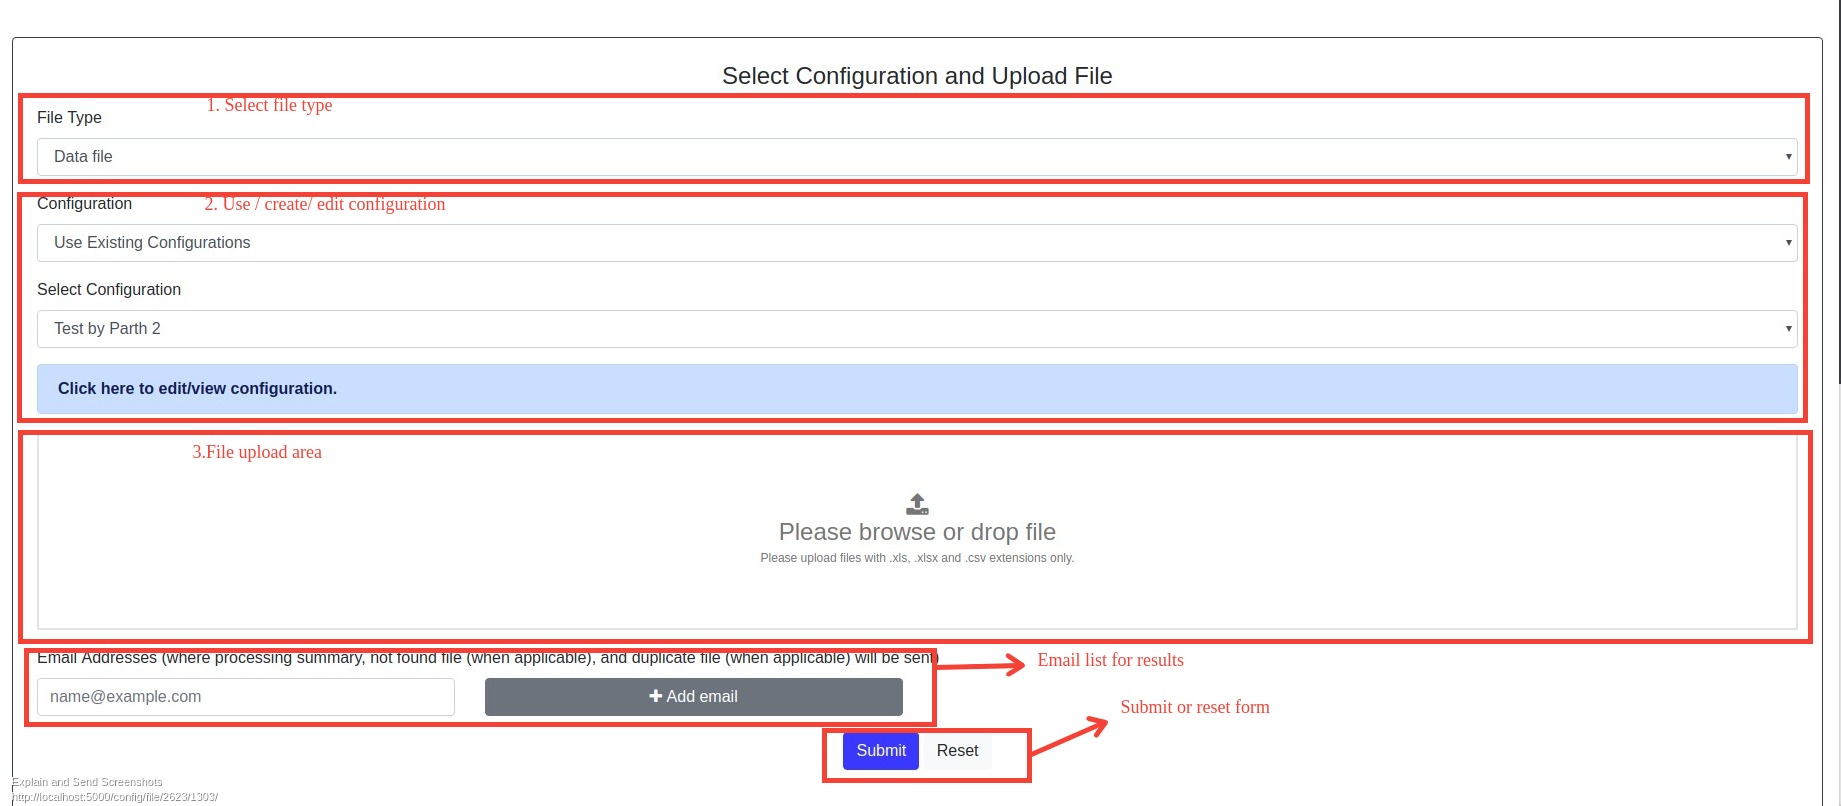
For processing file you need to do following steps:
- File type selection: Select file type notfound/datafile/duplicatefile.
-
Add/Edit Configuration (click to expand)
Select existing configuration from dropdown or create new configuration. Dropdown will display
three recent configurations.
This features allows you to create/modify configuration for BI Joe processing. Clicking on add/edit configuration file from file processing screen will open a configuration form. It contains three sections:
-
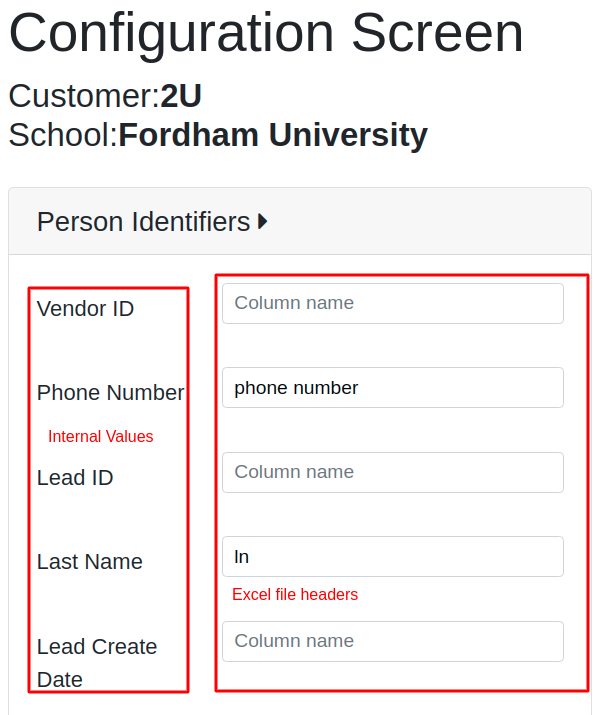
Person identifiers
- Person identifiers are the attributes that are used to find particular leadid from Azure DB. You must map at least 2 person identifiers
- You must map at least 2 person identifiers in the excel sheet
-
Outcome assignments
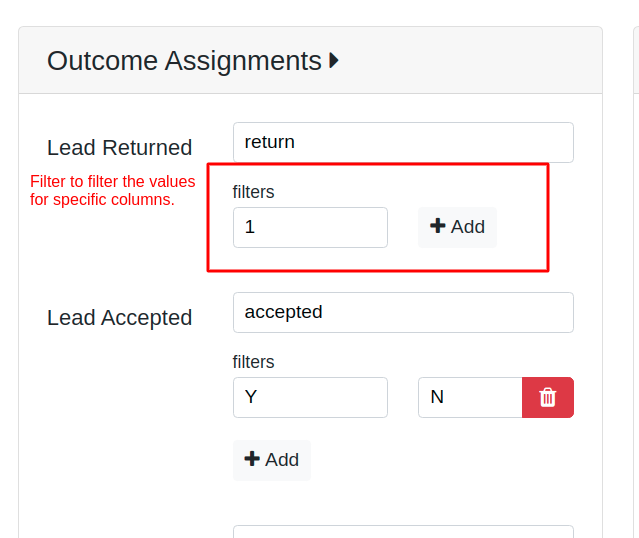
- Outcome assignments are the attributes that are used to filter the data as per the outcomes reported in the file
- You are required to map at least one outcome assignment
- Incorrect mapping will be ignored and only matching attributes will be used for outcomes processing
-
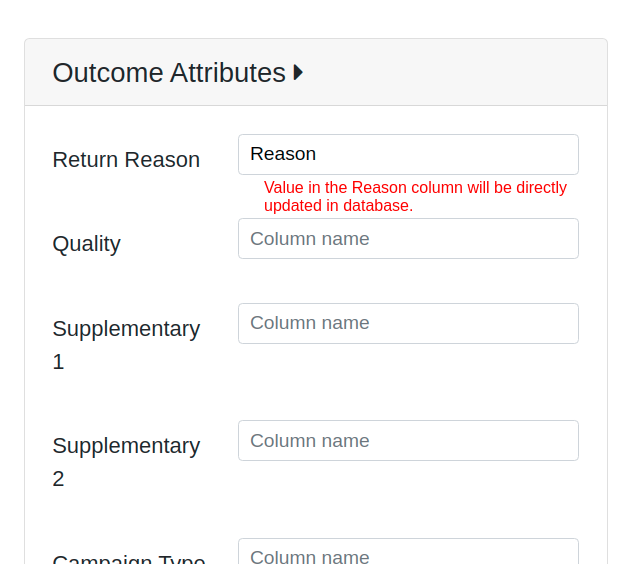
Outcome attributes
- Supplementary information regarding outcomes can be uploaded using this section
- This section is optional
-
Person identifiers
- File upload: Upload/drop file here.
- Emails: Add recepients who will receive success report and logs.
-
Previously
Processed Files
This section will maintain logs of previously processed files for the particular customer-school combination. This section also contains the undo functionality which will be explained in detail below.
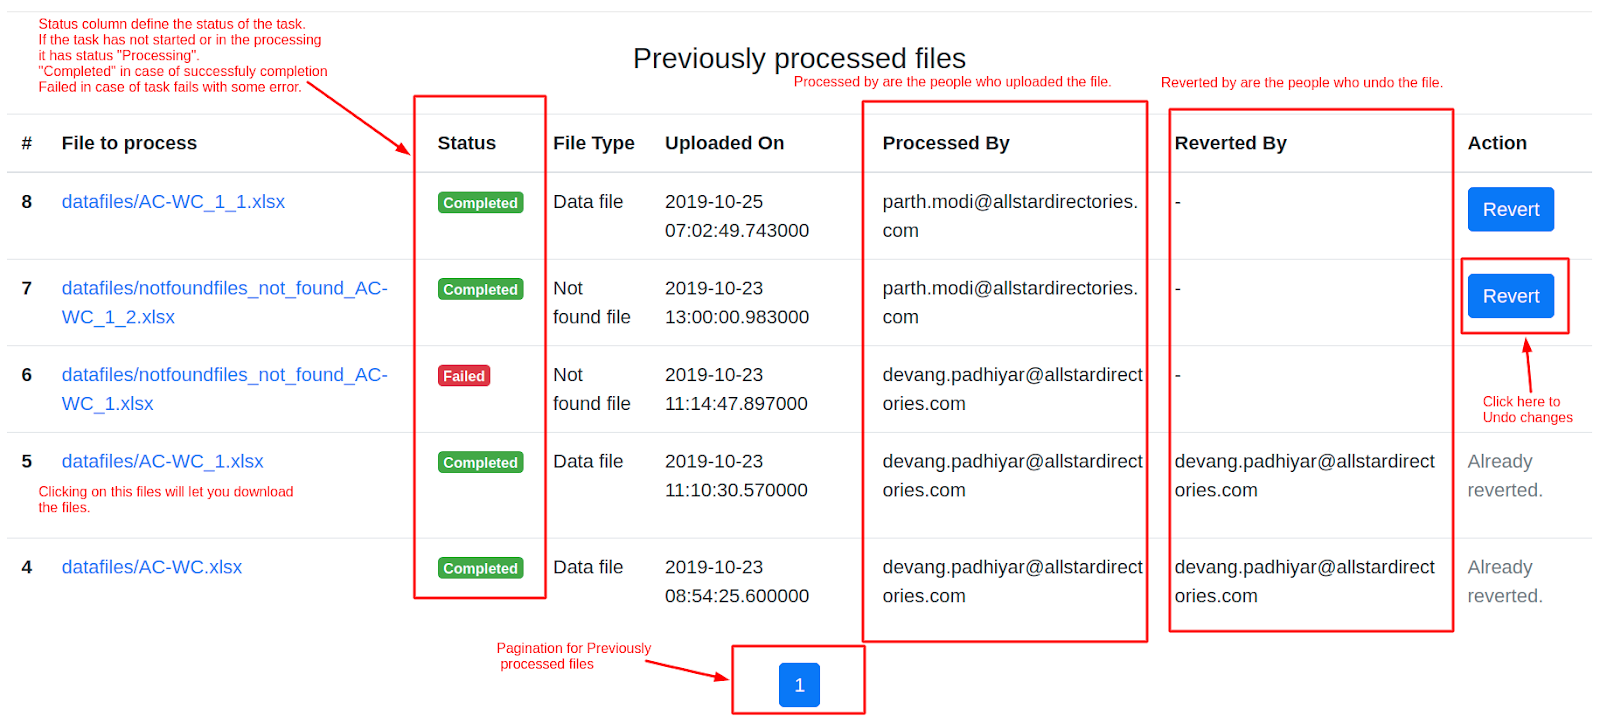
BI Joe can have the following statuses:
- Processing: Uploaded file is under process. Processing may even take a few hours if the file is huge.
- Completed: BI Joe has completed processing. You may even receive an email illustrating the results at this point.
- Failed: This status will occur only if there is a coding/functionality error in BI Joe Script. In case of such events, please contact the Data Analytics team or email data@allstardirectories.com.
- Nothing to update: There is nothing to update from a file.
- Reverting the changes: This status occurs when BI Joe is trying to undo outcomes.
- Reverted: Successfully reverted the changes.
- Revert failed: Revert failed due to some technical reasons. Please contact the Data Analytics team or email data@allstardirectories.com.
There are certain mapping rules governing each section which will be explained below. But please note that all field mappings are case insensitive, ignoring white space and underscores for excel headers, thus reducing the scope of manual errors.
PHONE NUMBER = Phone Number = phone_number = phonenumber = phone NUMBER = phone number
Reports, Not found file, Duplicate files and Undo
Reports
When the file processing is done, the success/not found/ duplicate report is sent to the respective email ids that were given while submitting the outcomes file. Each component of the reports is described below in brief along with reprocessing. Below is an example of the status report email.
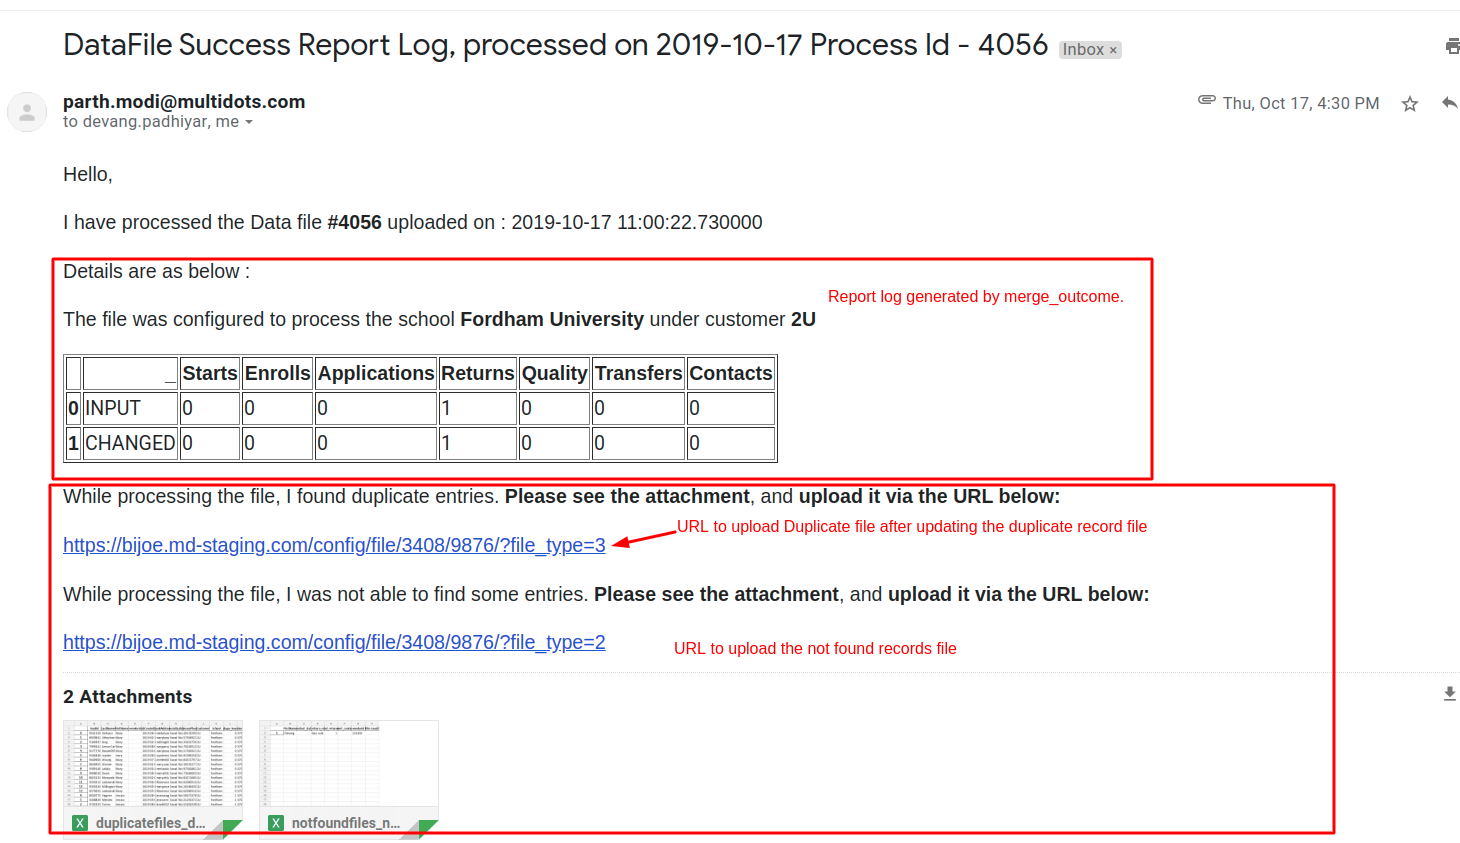
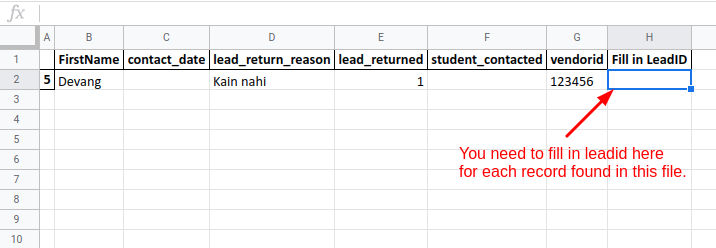
Not found file
When the file processing is done, the success/not found/ duplicate report is sent to the respective email ids that were given while submitting the outcomes file. Each component of the reports is described below in brief along with reprocessing. Below is an example of the status report email.
Process to re-upload:
- Open the not found file attached with the process file email
- Fill the Fill in LeadID column manually
- Open the link in the email below the text ...I was not able to find some entries… .
- Upload saved not found file in the file upload area
- Click on Submit after giving an email id
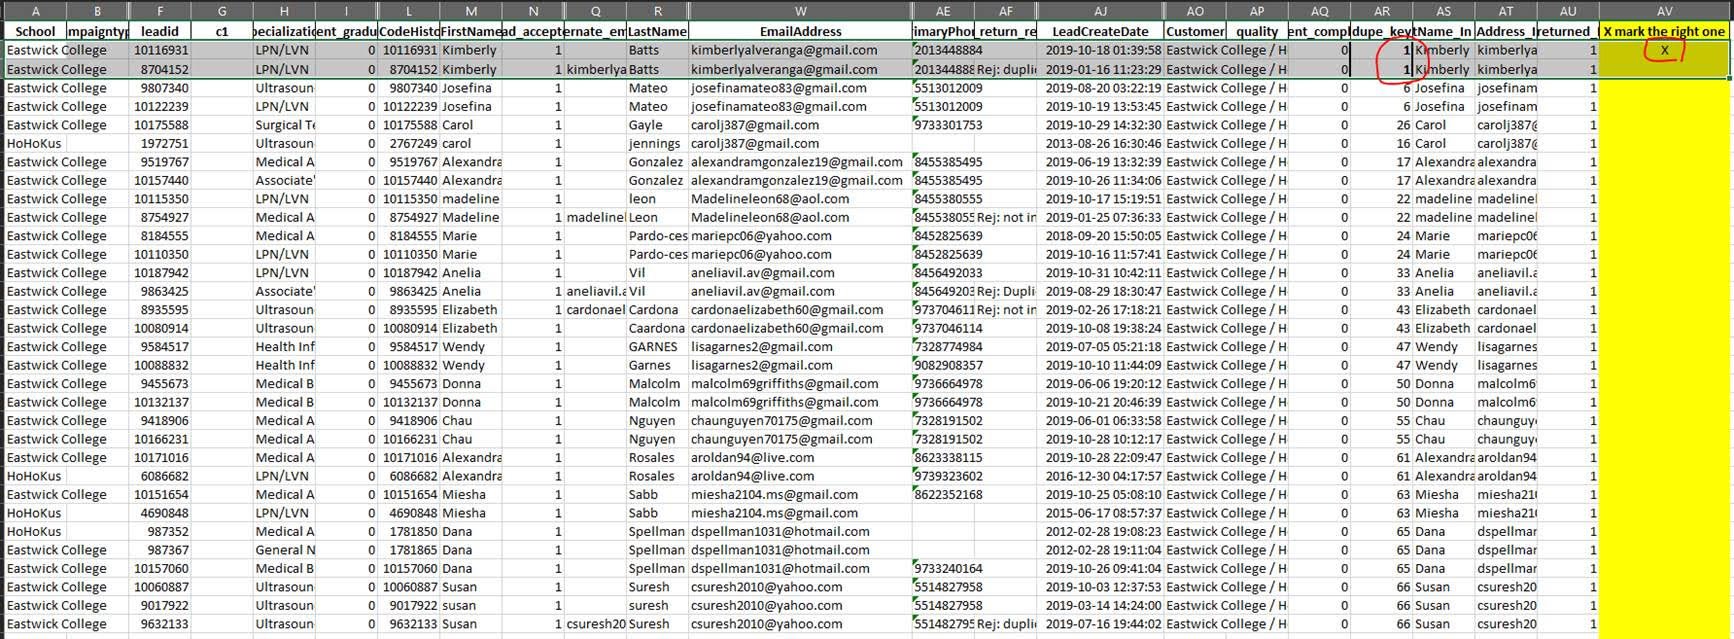
Duplicate file
If multiple records are found for leads as per the person identifiers mentioned, then these records find themselves in the “duplicate” file. All such records are sent in the email of the process file success report.
Process to re-upload:
- Open the duplicate file attached with the process file email
- Find column dupe_key . All dupes from one lead will have one number (the example below highlights 2 records with dupe_key =1)
- Select the true row (which you want to update records for) by inserting X in the
column with the header X mark the right one.
- It is the furthest-most right column in each Duplicate File
- Save the file
- Open the link in the email below the text which says that ...I found duplicate entries…
- Reupload the file in the file upload area on the URL.
- Ensure you have selected ‘Duplicate File’ filetype.
- Give an email and click on submit.
Undo/Revert Functionality
If the file is processed successfully and status is shown as completed, then you can undo the change by clicking the revert button under the actions column as shown below. Already reverted changes are displayed in gray color.

After clicking on the “revert” button, a detailed view of every lead and its value will be displayed. I.e how many inputs are there and how many records have changed due to this process. Below is a snapshot of all information seen as a part of the detailed view. Value with green background represents actually changed value.
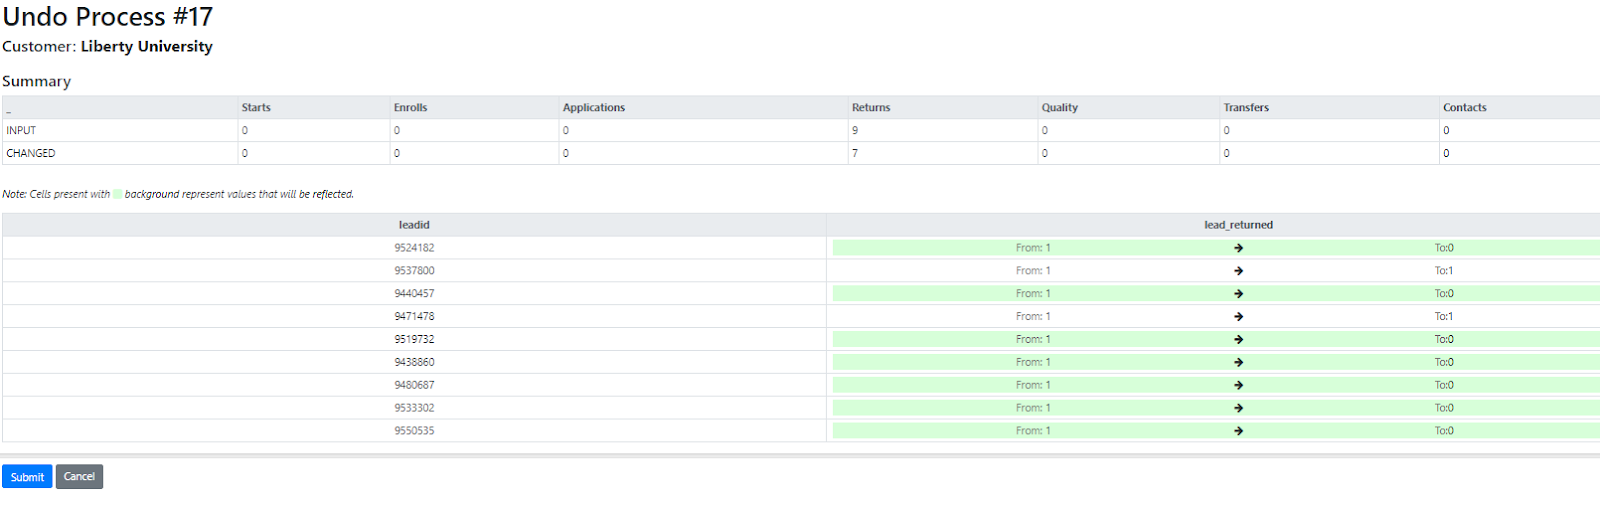
Clicking on the “submit” button will start the processing to revert the processed records. Please note that only records with green background will be reverted. The file processing screen will show a status of “Reverted” once this is complete. You will not be able to revert the undo process.
Drawbacks, limitations, and cautions
BI Joe can process files efficiently and instantly* (depends on the task queue). But it has few limitations and known issues that are described below.
File extensions.
- Currently, BI Joe can handle files that have xls, xlsx and csv extensions only.
- Other than those extensions BI Joe does not accept the file.
One sheet per one file policy.
- You can upload only one file at a time.
- The file should contain only one sheet. Multiple sheets in a single file is not accepted.
Person Identifiers and outcomes requirements.
- You need to specify at least two person identifiers and One outcome assignments in the configuration. Outcome columns are optional.
- Excel file should have at least two mapped headers specified the person identifiers in the configuration and one outcome assignment.
Task Queue mechanism
BI Joe uses a task queue mechanism to avoid database parallel processing conflicts. Once you upload the file BI Joe puts the task in the queue. The task manager executes tasks one by one. So other tasks need to wait for the current task to be finished.
Duplicates and not found file processing
Do not upload not found file or duplicate file directly in the file upload screen when the `Data file` option is selected. Select the appropriate option from the dropdown as your file type.
Support
Common issues
BI Joe is an automated data action tool that processes student outcomes and returns (Scrub) files, providing you with a rapid turnaround and insight into what has changed. Upload your outcomes and returns to B.I. Joe and expect the changes in the cubes the very next day.
What to do when things go wrong?
If you receive 500 server error or task failed error in the mail then please contact the data analytics team or email data@allstardirectories.com